> For the complete documentation index, see [llms.txt](https://docs.responso.com/responso-doc/llms.txt). Markdown versions of documentation pages are available by appending `.md` to page URLs; this page is available as [Markdown](https://docs.responso.com/responso-doc/en/integrations/other-integrations/integration-with-amazon.md).
# Amazon
### Step 1: Creating a new integration
{% hint style="warning" %}
When integrating a given marketplace, you must be logged into the Amazon website with the appropriate domain extension. For example, if you want to integrate a German account, you must be on [https://sellercentral.amazon.de](https://sellercentral.amazon.de/) ↗, if a Polish one – on ↗.
{% endhint %}
I. Go to your **Responso account** and click the **Add channel** button visible at the top of the page.
II. Choose the integration with **Amazon,** and then the appropriate country for the Amazon account you want to integrate.
III. A new tab will open in Responso - click **Connect with Amazon.**
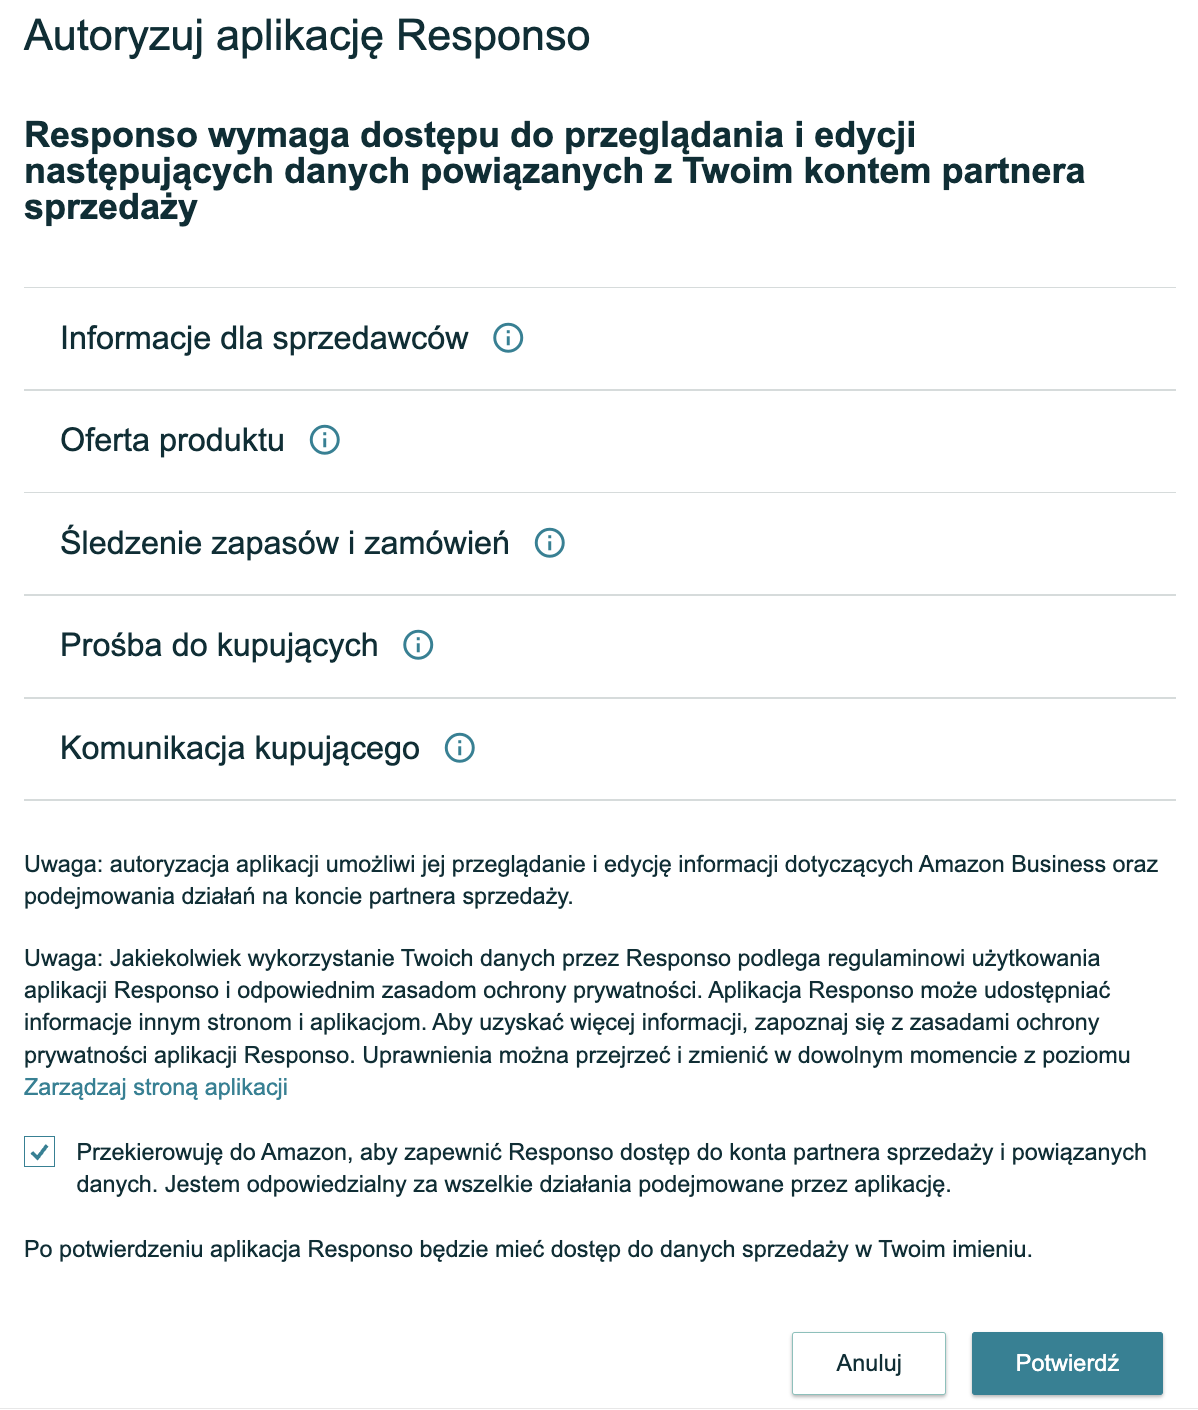
IV. After being redirected to the Amazon website, log in to the account you want to integrate.
V. Read the information regarding authorization, check the checkbox, and then click **Confirm.** You will be redirected back to Responso.
VI. The email address created for the integration will be displayed – you will need it in steps 2.1, 2.2, and 3 of this guide.
Click Copy next to the created address to use it in the following steps.
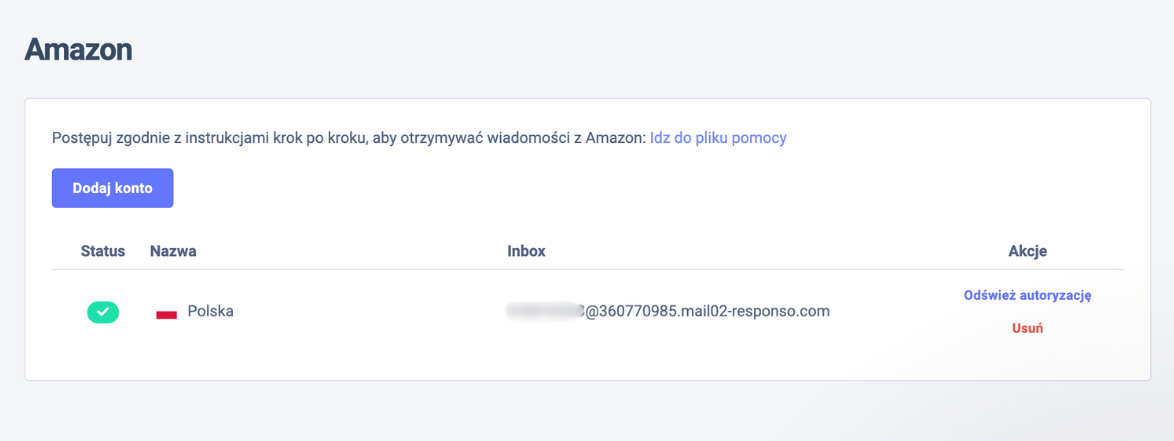
You will also see the integration created in Responso, along with the assigned email address, in the list of integrated Amazon accounts, which you can find by selecting ***Settings > Integrations > Amazon*****.**
View of Amazon integrations added in Responso.
{% hint style="warning" %}
If you have more Amazon accounts and want to integrate them, you must follow the instructions provided here separately for each one. Each Amazon account added in Responso is a separate integration, and each has a unique email address (inbox address, visible in the screenshot above).
{% endhint %}
{% hint style="info" %}
The next steps will be performed on the Amazon platform.
{% endhint %}
### Step 2: Forwarding messages to Responso
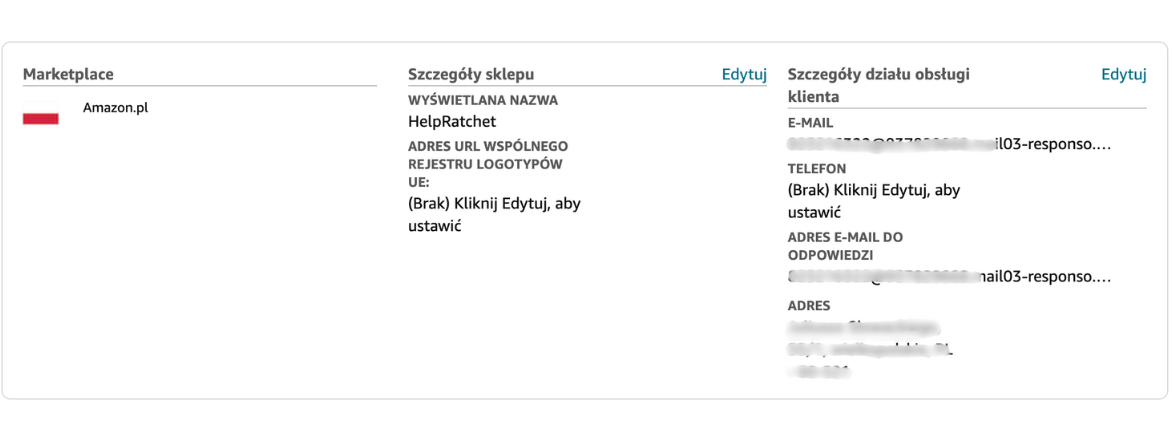
I. On the integrated **Amazon account,** click **the gear icon** ⚙️ in the top right corner and select **Account Info -> Business Information -> Your Seller Profile** (or use the [**LINK ↗**](https://sellercentral.amazon.pl/ap/signin?clientContext=261-0380474-4188667\&openid.pape.preferred_auth_policies=Policy15\&openid.pape.max_auth_age=300\&openid.return_to=https%3A%2F%2Fsellercentral.amazon.pl%2Fsw%2FAccountInfo%2FSellerProfileView%2Fstep%2FSellerProfileView\&openid.identity=http%3A%2F%2Fspecs.openid.net%2Fauth%2F2.0%2Fidentifier_select\&openid.assoc_handle=sc_pl_amazon_v2\&openid.mode=checkid_setup\&intercept=false\&language=en_GB\&openid.claimed_id=http%3A%2F%2Fspecs.openid.net%2Fauth%2F2.0%2Fidentifier_select\&pageId=sc_amazon_v3_unified\&openid.ns=http%3A%2F%2Fspecs.openid.net%2Fauth%2F2.0\&ssoResponse=eyJ6aXAiOiJERUYiLCJlbmMiOiJBMjU2R0NNIiwiYWxnIjoiQTI1NktXIn0.EPDY13_pXkY8wWka3NhIGh0fk-TVhUIdnIA5MCg1K3J_AXa0B3ySBA.5Du4zy_rUHtpW6Io.zKB3hY87_jahA-YKamyf6CyYe37PtoXfJ61An5RLGP8M_PnWDjSq_E8v5ozZQYpBBWRR3aErIeKV5n0XVLv3IoEhJCKH-z8aSDo7pxpm4wZMfmeu6i5nFLNBMSw5fviiO4cRsm-KrE8F3BBemKpF3TqD9I7Y2gw7FFIALSehkHARsdtcB5l_Fy2iZ0LhpwCYyip2Ck37Hw.qbiGuyaYUf5eDNIhWvQaRw)).
II. Find the relevant marketplace (e.g., *Amazon.de*) and click **Edit** in the **Customer Service Details section.**
III. Paste the email address generated for the given integration in Responso into the **Customer service email and Customer service reply-to email fields.**
{% hint style="info" %}
The email address generated in step 1.VI of this guide should be used here.
If you haven't done this before, go to **Settings -> Integrations -> Amazon** in **Responso** and copy the inbox address for the selected integration (it will be marked with the flag of the corresponding country).
{% endhint %}
IV. Scroll down to the bottom of the page and click **Submit.**
### Step 3: Forwarding notifications to Responso
{% hint style="warning" %}
In this step, you should also use the email generated in step 1.VI of this guide. It is the same email we used in step number 2.
{% endhint %}
#### 3.1. Returns, claims, and delivery notifications
I. On the previously integrated Amazon account, click **the gear icon** ⚙️ in the top right corner and select **Notification Preferences** (or use the [**LINK ↗**](https://sellercentral.amazon.pl/ap/signin?clientContext=261-0380474-4188667\&openid.pape.preferred_auth_policies=Policy15\&openid.pape.max_auth_age=300\&openid.return_to=https%3A%2F%2Fsellercentral.amazon.pl%2Fnotifications%2Fpreferences\&openid.identity=http%3A%2F%2Fspecs.openid.net%2Fauth%2F2.0%2Fidentifier_select\&openid.assoc_handle=sc_pl_amazon_v2\&openid.mode=checkid_setup\&intercept=false\&language=en_GB\&openid.claimed_id=http%3A%2F%2Fspecs.openid.net%2Fauth%2F2.0%2Fidentifier_select\&pageId=sc_amazon_v3_unified\&openid.ns=http%3A%2F%2Fspecs.openid.net%2Fauth%2F2.0\&ssoResponse=eyJ6aXAiOiJERUYiLCJlbmMiOiJBMjU2R0NNIiwiYWxnIjoiQTI1NktXIn0.J_GW7TyqyY7PDBvyRXTmO_xbHrHEnqXtdL975Pdw62trM_G0V5hRUg.n6xOj9eA0Mww63BZ.nlEQ-lKJxhAsd9VtVc07QY4qvdZc3lpCrGU72tqrdKe1jHZZOdFbpLg7-SfO-G_bK8PnlU1z8bKw6HJNoHdSLFCk9MTpcKuUWC07sH0b2-IHyRiYASNBfxLqMQP-rlR1pNfGC3Lm3sNVB_-4KlRQI1KHL2fr15eC9wpPZuRa-AWrWNsG9LN2OaEfy5niA3hrbFVrqTUT.kHaKjIp-aC2PMUx06cZZqQ)).
II. Scroll down to the **Returns, claims, and delivery notifications section** and click **Edit.**
III. In each row (**Pending Returns, Claim Notifications, Return Notifications, Grade and Resell Notifications**) click **Add another** and paste the address copied from Responso.
{% hint style="info" %}
These fields can contain multiple email addresses – you do not need to delete previously added ones. The Responso email address can be one of many addresses added here.
{% endhint %}
IV. Click **Save** to keep the changes.
#### 3.2. Messages
I. Scroll down to the Messages section and click Edit.
II. In each row (**Buyer Messages, Confirmation Notifications, Delivery Failures, Buyer Opt-out**), click **Add another** and paste the address copied from Responso.
III. Click **Save** to keep the changes.
### Step 4: Authenticating the email address from Responso
To enable replying to Amazon messages within the Responso panel, you must add the return address of your Responso account in the settings on the Amazon side – as a trusted email address.
{% hint style="warning" %}
In this step, we are using a different Responso email address than before – the return address of your Responso account. Unlike the email address used in steps 2 and 3, it is the same for every Amazon integration you perform, regardless of the language version.
{% endhint %}
I. In **Responso**, go to **Settings -> Domain and email address -> Return addresses** and copy the email address on the list labeled Responso.
{% hint style="warning" %}
If you have more return addresses in this section than just the default one, you must repeat this step for all email addresses in the *Return addresses* section – authenticate all return addresses on the Amazon side. If you change your return address in the future, remember to update it on the Amazon side.
{% endhint %}
II. On the previously integrated **Amazon account,** click the **envelope icon** ✉️ in the top right corner, then hover over **Messaging Settings** and select **Permissions** (or use the [**LINK ↗**](https://sellercentral.amazon.pl/ap/signin?clientContext=261-0380474-4188667\&openid.pape.preferred_auth_policies=Policy15\&openid.pape.max_auth_age=300\&openid.return_to=https%3A%2F%2Fsellercentral.amazon.pl%2Fmessaging%2Fpermissions\&openid.identity=http%3A%2F%2Fspecs.openid.net%2Fauth%2F2.0%2Fidentifier_select\&openid.assoc_handle=sc_pl_amazon_v2\&openid.mode=checkid_setup\&intercept=false\&language=en_GB\&openid.claimed_id=http%3A%2F%2Fspecs.openid.net%2Fauth%2F2.0%2Fidentifier_select\&pageId=sc_amazon_v3_unified\&openid.ns=http%3A%2F%2Fspecs.openid.net%2Fauth%2F2.0\&ssoResponse=eyJ6aXAiOiJERUYiLCJlbmMiOiJBMjU2R0NNIiwiYWxnIjoiQTI1NktXIn0.wKGSFKeI8sSSwzcKrv00vtM50K3xlH_YerqFSQzQYL5T_AtqNa_nbw.2358np7lqgIbZa_d.ehCYLBGkn-n-3gIG593SBwKzAaSmgbCYj6yXfngsaNtpii_N7IIOqU33DYcQog5Qnj9Bkb0X_nBgAP4BNC7supOg0oK7qd67U5JEFhF4pg3ihyTKdOka5avZ0XxTVGo4tKrjfCy6FNkQ-rLAkEgg2KTycT8wifd6IFXmRLaQQpAtpBYFu7SQR_cnFEyxmWQ3edOEWvE.57dzNkKlatCWvtT0Q2lOXw)).
III. At the bottom of the permissions window, click **Add an email address.**
IV. Paste the address copied from Responso (step 4.I.), leave the messaging permissions enabled, and click **Save.**
If you have trouble with this step, watch the video:
{% embed url="" %}
## FAQ
### How quickly are messages downloaded for the first time?
After successfully adding the Amazon account, current messages will be downloaded. The mailbox integrates instantly.
### How many messages will be downloaded?
Messages from before the integration with Responso will not be downloaded and will not be visible in the inbox. The integration will only apply to new messages from Amazon.
### Where can I see information about Amazon messages in Responso?
The most important data from Amazon in Responso appears in the main window in the list of all messages. Messages from Amazon are marked with the appropriate logo:
Message list view
More detailed information about a specific message can be found in the ticket view, on the right side (after opening a specific message). This includes: buyer's name, order number, product name, sales date, sales channel, shipping address, and estimated delivery date.
Ticket view with order data
{% hint style="info" %}
If you plan to set up an autoresponder for the Amazon integration, you should know that Amazon may block immediately sent automatic replies. For safety, it is worth setting up an autoresponder that will be sent with a one-hour delay.
{% endhint %}
### Attachment Handling
The Amazon integration supports attachments with the following extensions:
.pdf,
.doc, .docx, .dot, .xls, .xlxs, .xlt, .xla, .ppt, .pptx, .pot, .pps,
.odc, .otc, .odb, .odf, .otf, .odg, .otg, .odi, .oti, .odp, .otp, .ods, .ots, .odt, .odm, .ott, .oth,
.rar, .zip,
.bmp, .gif, .jpg, .jpeg, .jpe, .jif, .jfif, .png, .svg, .svgz, .tif, .tiff, .psd, .webp,
.txt, .text, .log,
.zz, .epub, .mobi, .azw,
.mp4a, .m4a, .mp4, .mp4v, .mpg4
### Why do messages from the Amazon integration have different sources?
Some of the tickets coming from the Amazon integration are marked with the source Amazon (icon with the Amazon logo), and some with the source Email (envelope icon), as in the example below.
This is because some messages come directly from the @marketplace.amazon.de domain (e.g., as an email ), while some come as notifications from the platform, e.g., from the @amazon.com domain (for example, from ).
Only messages from the @marketplace.amazon.de domain will be marked with the Amazon logo icon – as the Amazonsource.
{% hint style="info" %}
This will be differentiated in the same way in Responso reports. Some messages from a given Amazon integration will be classified as the Email source in reports, and some as the Amazon source.

{% endhint %}
Most common difficulties:
Messages are not downloading
First, check if an icon indicating account issues has appeared (the icon ⏱️ in the top right corner).
If information about an issue with a given account is displayed, try adding it again. If this doesn't help, send us a message at ✉ – we will investigate what is going on.
.png?alt=media&token=2077da25-e9c3-4cde-b45f-d15b4f7bd8fc)

.png?alt=media&token=6e9555a2-a6f9-46c1-9c55-10fc238593b8)